Friday, November 1, 2013

Let's Get Festive

Most people hate it that the second Halloween is over, the Christmas season starts.  But I love it.  My Halloween decorations are put away and I am excited to get started making some Thanksgiving home decor.  I am also hosting Thanksgiving dinner this year and I am looking forward to using the fantastic Thankful Tablescape to adorn my tables.  But most of all I need a way to organize everything.  Cue the Season of Style This and That Journal.


I only had a small window of time to craft today since my son wasn't in the napping mood.  So I took some great DSP and ribbon to decorate my Holiday Planner for this upcoming season.  Inside I have 8 card sketches that I can't wait to get to.  Fortunately, tomorrow I will be creating all day at a crop!  I can't wait to share my creations!    


Friday, October 25, 2013

Tags 4 You Day 5

Here are two Halloween tags made with this great stamp set.  Sorry for the short and late post but we have a busy day ahead of us, I can't be spending the day on the computer!


Thursday, October 24, 2013

Tags 4 You Day 4

So I had to improvise a little.  Our Spring catalog is not out yet so when it came to Valentine's Day paper, I chose the Modern Medley DSP.  I thought the Black and Ivory pattern with Cherry Cobbler accents would be pretty romantic.  I made a few little packages all from paper and included the Happy Heart Day stamp from Tags 4 You.  I really like how they turned out.


Here is the Mini Milk Carton Die with some ribbon and a retired clip.


I made the box using the Envelope Punch Board.  I decorated it with some retired tulle in Cherry Cobbler and finished it off with a tag embossed with the Pretty Print embossing folder.


Here is the Petite Purse Die trimmed with some Very Vanilla satin ribbon.


And finally here is a CD case.  I might be showing my age here, do kids still burn CDs?  I was like queen of the mixed tapes growing up.


Stay tuned for Friday when I share some creative ways to dress up your Halloween treats!  

Wednesday, October 23, 2013

Tags 4 You Day 3

Sorry this is so late...my 3 month old son wasn't such a good napper today.  But for you late night blog surfers, you are in for a treat.  I made some Christmas tags which was perfect since it was chilly in my neck of the woods.  Enjoy!


Here are pictures of each tag individually.  


Check back tomorrow when I make some gift packages with the Happy Heart Day stamp from Tags 4 You.  On Friday I will be featuring the Halloween stamp with candy toppers.  

Tuesday, October 22, 2013

Tags 4 You Day 2

Initially I was going to show some quick and easy projects with the Tags 4 You set.  The problem is...I have a hard time with quick and easy sometimes.  What started as let's make a five minute tag turned into a bigger ordeal.  However I love the finished product!  Here are some wine tags perfect for that bottle of wine you might bring your Thanksgiving hostess.


I made four more as well.  All tags use the Sweater Weather DSP and coordinating card stock (Chocolate Chip, Tangerine Tango, Crushed Curry, Sahara Sand, Soft Sky and Very Vanilla) as well as the paper doilies sponged in those same colors.  I also added the leaves from the Wonderfall set and the Autumn Accents Die for the Big Shot.  I finished it off with the Tags 4 You Thanksgiving stamp, backed by the Decorative Label punch, some ribbon and a button with twine.


Check back tomorrow for some more tags!
   

Monday, October 21, 2013

Tags 4 You

I saw this stamp set in the Holiday catalog and I had to have it.  It is bundled with the awesome Label Bracket punch for $26.95 (for the clear mount stamp set).  I just knew I could do so much with this set, so for this week I will be featuring several different projects centering around this bundle.  Here is my first project, a set of four basic cards.  


First up is the Halloween one.  I used a small strip of Witches' Brew DSP, some Basic Black and Pumpkin Pie Card Stock, Pumpkin Pie Ribbon, and the cute bat from the Halloween Hello stamp set.  For a little extra, I embossed the Trick or Treat stamp and used the Black Glitter on the bat.  


Next on the Thanksgiving card, I used some Sweater Weather DSP along with Chocolate Chip Card Stock, Crumb Cake ribbon and some Champagne Glimmer Paper.  The leaf is from the Wonderfall set and its stamped in Sahara Sand.  


In this Christmas Card, I used some Seasons of Style DSP and some Cherry Cobbler Card Stock along with Old Olive Ribbon and the Red Glimmer paper.  


And finally for the Valentine's Day card, I used some retired Pool Party DSP along with some Real Red Card Stock and Silver Ribbon and Glimmer Paper.   


Simple cards put together quickly.  But we can do much more with this stamp set and punch, so stay tuned for some gift tags as well as some stepped up cards.  Thanks for looking!

Friday, October 18, 2013

Halloween Cards

With all the fabulous SU! products, I had to make some Halloween cards.  I will send them to my nieces and nephew.  Plus in making these cards, I discovered love for a new product... washi tape! 


In my first card I used the Halloween Hello stamp set and the Witches' Brew Washi Tape.


In the next card, I used the Perfectly You Hostess set, the hexagon punch, and the Witches Brew DSP.  I also did some embossing to add some texture.


Finally in this last card, I used the Halloween Bash and Gorgeous Grunge stamp sets along with the Witches' Brew Washi tape. 


Check back next week where I show you how you can use one stamp set and matching punch to create  simple cards for the next four holidays (Halloween, Thanksgiving, Christmas, and Valentine's Day)!  

Tuesday, October 15, 2013

Halloween Decor

I love that I can use my Stampin' Up! goodies to create home decor pieces.  We love Halloween in the Gregorsky family.  We have all sorts of decorations up, including some that are handmade by me! 

First I wanted to share a banner I created from the Build A Banner kit in the holiday catalogue.  Aside from the kit, I also used the Witches' Brew DSP along with matching card stock, ribbon, and buttons. 


Second I wanted to share a Halloween Tree I made with some spooky ornaments.  I used some retired Halloween DSP and various stamp sets (some current and retired).


Finally, here is a little decor piece.  I have one of these for every season.  I used the Witches' Brew DSP and the Halloween Hello stamp set. 


You will notice that all my projects here use the rosettes.  Of course I have the Rosette Die for my big shot which makes these so easy!  

Sunday, October 13, 2013

Newest Creation

Have posted in awhile but on Thursday, July 25th I finished a project that had been in the works for awhile now.  My son, Thomas John Gregorsky was born weighing 9 lb and 8 oz and 21.5" long.  I have had some time to craft and am looking forward to sharing my projects with you.  For now here is one page I made for Tommy's album.

Thursday, May 30, 2013

My Paper Pumpkin

My Paper Pumpkin is a monthly craft escape.  For $19.95, you will get everything you need to create a paper project, except adhesive.  It's a surprise each month.  Here are examples of my take on these kits.  For two of the cards, I used the supplies provided and for the other I used some additional supplies I had in my craft room.  May's kit is a fantastic mini album...I can't wait to play with that! 


Want to join in on the fun?  Go to My Paper Pumpkin and choose me (Jennifer Gregorsky) as your demonstrator.  If you live in the Lehigh Valley, let me know when you get your first kit and maybe we can get together to create?    

Wednesday, May 22, 2013

End of Preschool

Today we celebrate Jessica's last day of preschool at Red Door.  Of course, I had to make some thing special for her wonderful teachers.  I decided to make little mini photo albums with a matching thank card.  I used all sorts of DSP from my stash...dare I say I even made a dent in it.  I used the same sketch for each card but different DSP.   


Here is a close up of the card and album with last years fabulous SaleABration paper.   


And for the school I created a School Supplies Cake full of things I know they need.  This was so easy to do and would be a wonderful gift for any teacher/preschool.


Here is a close up of the little banner I made at the top.


I feel like I could never do enough for this amazing staff of teachers.  My daughter will be heading to various camps and activities over the summer, but it won't be the same.  She is very excited to head off to kindergarten in the fall, but we are sad to say goodbye for now.  Her little brother is looking forward to making his debut at Red Door in the fall of 2016!

Sunday, May 12, 2013

Happy Mother's Day

Today, after a home made breakfast from my husband and daughter, we are heading up to my in-laws for Mother's Day.  I thought I would share my creation for my mother-in-law.  I actually got help from both my husband and daughter.


And here is the card.


I hoe everyone enjoys this wonderful day with their families.  We will be spending next Saturday with my family.  I am very lucky to have such a wonderful mother who is also my very best friend.    

Friday, May 10, 2013

Wonderful teachers...

As I have mentioned before, I am blessed with a fantastic preschool for my daughter.  She attends Red Door Early Learning Center where she has developed such a strong academic foundation with the help of her caring and supportive teachers.  I have also been fortunate to have the opportunity to spend extra time in her class as a substitute teacher.  I will say, its surprising how similar teaching preschool can be to teaching high school; kids always have to go to the bathroom, constantly require refocussing and most importantly need to know that their teachers truly care about them.  

I will get off my soap box to share some creations, first the Teacher Appreciation gifts I coordinated for the teachers, from my daughter's class.  I had each student write a little message or draw a picture for each teacher and folded it into a little fortunate cookie.  I also made a thank you card using the chalkboard technique and finished the card off with a little banner.    


I had volunteered my paper crafting services for a Teacher Talent Auction that was held to benefit the school.  I have finally finished 2 sets of 40 handmade and hand stamped cards with coordinating envelopes.  I wanted to share a few of the cards I created.  I received some fabulous inspiration from other fantastic SU! demonstrators!  


Thanks for looking!  

Sunday, March 31, 2013

Happy Easter

I hope everyone has a wonderful Easter.  Our little girl was so excited by her Easter basket that she had asked if we could call the Easter Bunny to thank him.  I think we will have her write a note instead.  Here is a quick lay out I made this morning using this years photo with the Easter Bunny.


I decided to used the Patio Party paper because it was so fun and it had butterflies...I love butterflies.  This layout did not take long, one of the many reasons I love using SU! products...the projects create themselves sometimes.


And here are two Easter cards I created for a customer, I had to keep some samples for myself.  Again more butterflies, but this time instead of setting them off with a rhinestone, I added some Dazzling Details for some sparkle.  And how awesome if that flower from the Oh, Hello stamp set?  Then I tried my hand at some punch art to make a bunny.  I had some of the Flirtatious DSP from last year for the background.  

In a little but but we will be off to my parents house from an Easter Egg hunt and Easter dinner, but I had to share my quick Easter projects with you.  Hoppy Creating!  :)  

Sunday, March 24, 2013

Butterflies

My blog has been a little quiet recently. I had been helping at my daughter's preschool and I will be blogging more about that since I was definitely being crafty there.  This weekend, I did get some time to work on some cards with some fabulous new butterfly products I had ordered.  The stamps and punches go together like peanut butter and chocolate!  Okay, so I have also been enjoying some Easter candy while crafting.  On with some photos.  The first set would be great for the beginner stamper.    


This first card is so simple...one sheet of paper, two stamp sets, three colors and my paper snips to create a custom made die cut card.  


This one is a little trickier...I did some masking and quite a bit of Big Shot-ing.  


Here is just a few punches and the awesome Oh, Hello stamp set.  I used some of my favorite colors here; Pool Party, Island Indigo, and Lucky Limeade.  


I really love this color combo, the Raspberry Ripple and Summer Starfruit go so well together.  And I was so happy to finally use the Hexagon embossing folder.  I don't do a lot of white on white, but I think I will start....it is such a simple but dramatic look.  


Here are some stepped up butterfly themed cards.  Some have a vintage style to them...a style I am really starting to get into.


I love this card...it was inspired by a fellow stamper.  I love the color combo and all the sponging. 


I love the Coral Calypso and Crumb Cake together in this card.  And a little bit of Dazzling Details makes this butterfly sparkle...its much better in person!


This card was also inspired by a fellow stamper.  I loved the Postage Due stamp set, but I haven't really used it enough.  Well that is about to change.  


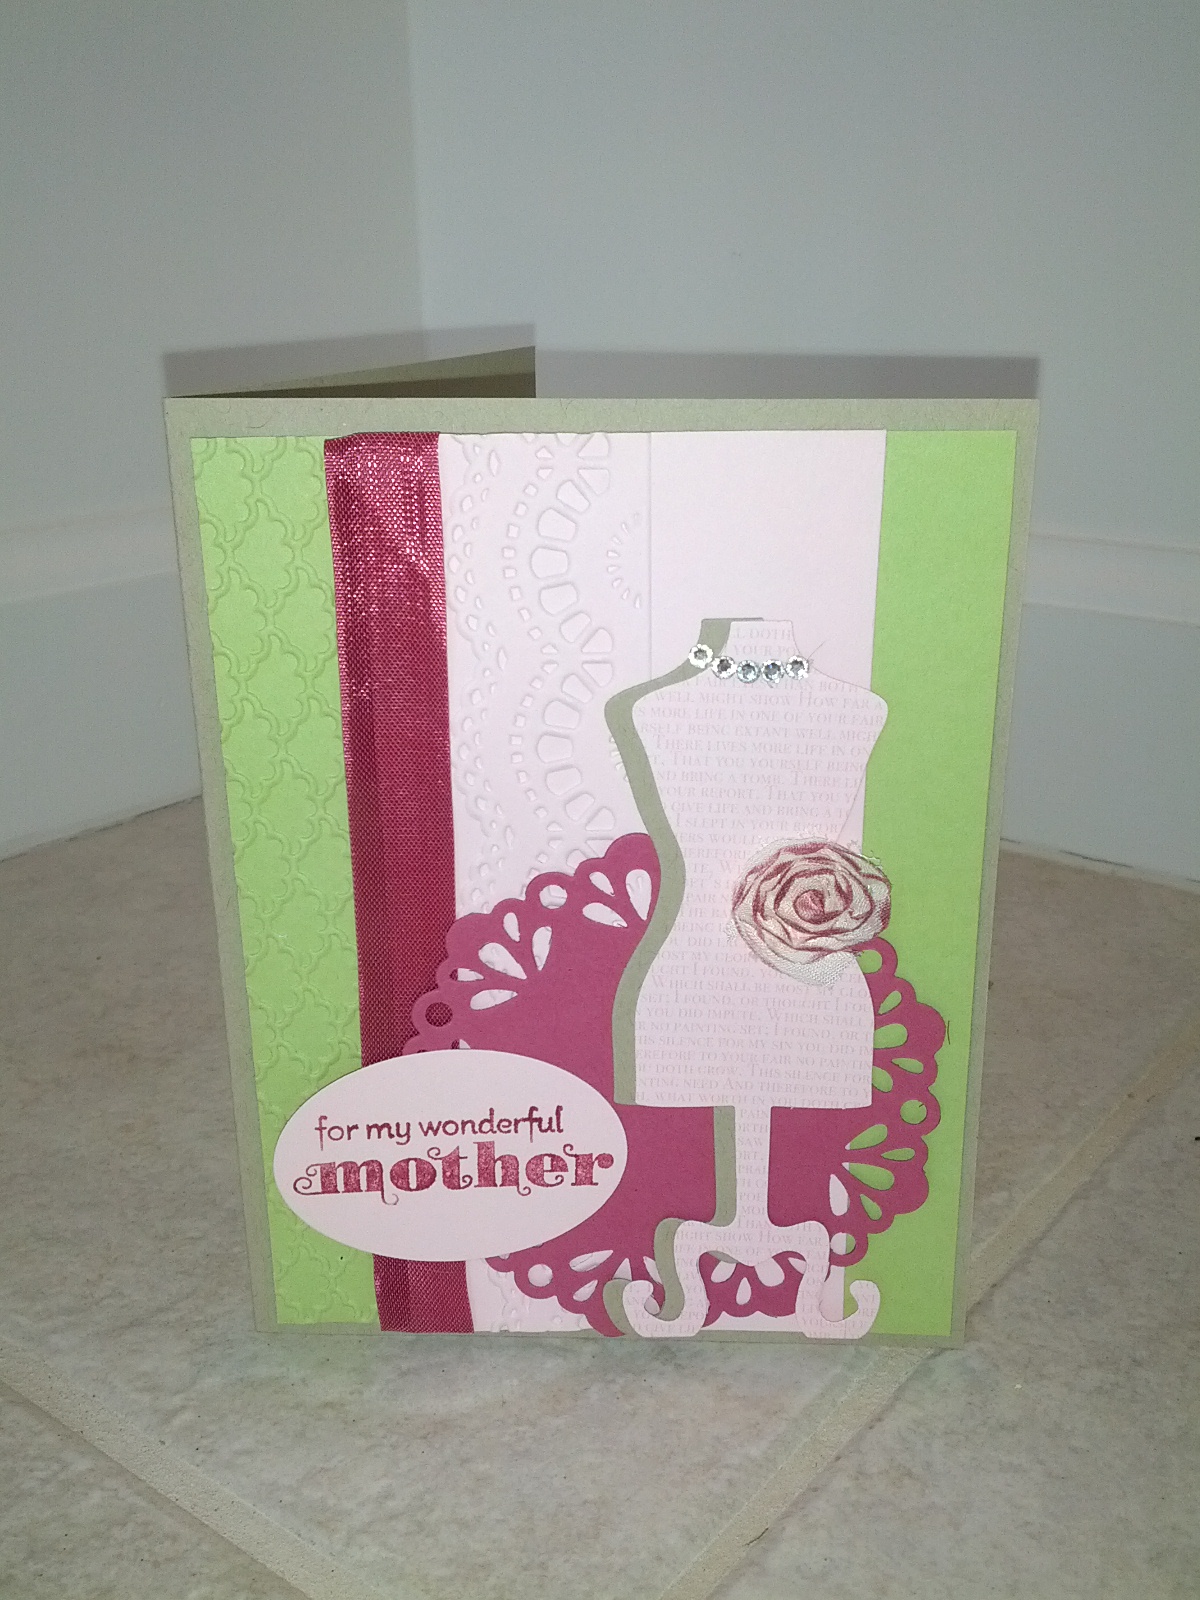
And finally this card uses all sorts of goodies; both butterfly punches, the petite curly label punch with matching stamp sets to go with and the Print Poetry DSP card stack.  The patterns in card stack are awesome, perfect for all occasions!


I hope you enjoyed my creations.  I hope to be back soon with a sneak peek at what I had been doing at my daughter's preschool!