Monday, February 27, 2017

February Technique Challenge

Happy Monday!  It has been a very busy weekend here.  I had a super fun stampin' party yesterday and got a chance to catch up with my friends while creating, pretty much a win-win!  Today we have a fabulous technique challenge for you over at SSI.  Check it out:

  
I love embossing.  So this technique was perfect for me.  I know I tried it before but I am not sure that I knew the name of it.  Here is my card:


I knew this rose would be perfect for this technique.  I went with a Melon Mambo card base.  I stamped the large image with versa mark and then heat embossed on vellum.  I flipped the vellum over and colored with some Stampin' Write markers.  I decided to go with a bright color and then a lighter complimenting color.  For the pinks I went with Melon Mambo and Flirty Flamingo.  For the the shades of green, I chose Cucumber Crush and Mint Macaron.  I stamped the sentiment with Flirty Flamingo and cut out a stitched oval and layered with with a scallop oval.  

This card was so fun to do.  Head over to SSI to see the other designer's creations and then upload yours!  

Friday, February 24, 2017

A Tasty Cupcake Truck

I was so excited when I saw the Tasty Truck stamp set in the Sale-A-Bration brochure.  But unfortunately I got excited about a lot of things in that brochure and the 2017 Occasions Catalog.  I am featuring the Tasty Trucks stamp set at my Open House this weekend and I have a quick and easy card I made with this set to share:


I started with the Thick Whisper White for my card base and added a layer of Tempting Turquoise card stock.  I used the streamer print from the Festive Birthday Designer Series Paper.  I stamped the truck on some more Whisper White and layered it on some Melon Mambo.  I colored my cupcake truck with the amazing Watercolor Pencils and used a blender pen to blend the color in.  I finished the card off with some Crushed Curry Baker's Twine.  I think this would be a sweet card for any cupcake loving person to get!  

This is one of my favorite Sale-A-Bration stamp sets.  To see some of the other favorites from the designers over at SSI, head there!  

Wednesday, February 22, 2017

A Sweet Ferris Wheel

One of my favorite suites from the 2017 Occasions Catalog is the Cupcakes and Carousels Suite.  The Designer Series Paper Stack has super fun patterns in yummy colors.  And the stamp set is absolutely adorable.  I had already played with the carousel horse several times and this time I wanted to show off the delicious cupcake ferris wheel: 


I decided to make a gate fold card.  I chose the fun striped pattern on the one side and the Bermuda Bay Glimmer Paper (new Sale-A-Bration offering!).  I stamped the ferris wheel with Early Espresso and added the cupcakes using the Up & Away framelit dies.  I stamped the sentiment underneath in Calypso Coral.  Here is the inside: 


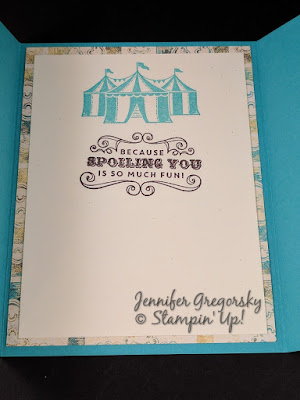
I used a sheet of the Cupcakes and Carousels DSP and layered on some Very Vanilla stamped with the fun tent and the sentiment.  This suite of products is so fun.  For more INKspiration, head over to SSI where our designers are showing what they can do with this fabulous suite!

Monday, February 20, 2017

February INKspiration Challenge

It is already Monday and I hope that you are having an uplifting start to the week.  We have a fabulous INKspiration challenge for you this week at Stylin' Stampin' Inkspiration, check it out:


Hot-air balloons are totally on trend right now.  And the Lift Me Up bundle along with the Carried Away DSP are pretty much my favorites right now, check out the Sampler I made with these fabulous products:


I started with a 12 x 12 piece of Night of Navy and mounted on a 9.25 x 9.25 piece of Whisper White.  I made 5 smaller 3 x 3 squares and one 6 x 6 square.  Here is a close up of each part:


The Carried Away DSP has so many fabulous prints and the colors are bright and bold.  In the top right corner, I cut some clouds out with the Dazzling Diamonds Glimmer Paper.  I stamped and die cut a Night of Navy balloon to create a little scene on the Peekaboo Peach patterned paper.  To the left I took the fun balloon patterned paper and mounted it on some Watermelon Wonder card stock.  I added some Peekaboo Peach ruffled ribbon.  


For the large square, I let the Mint Macaron cloud pattern paper be the background to a trio of die cut balloons.  The largest one is the detailed balloon cut in Smoky Slate with stripes underneath in coordinating colors.  For the smaller balloons I stamped with Smoky Slate on to some Smoky Slate card stock and die cut them with the Up & Away framelit dies.  I also die cut the DSP and then trimmed it and layered on the Smoky Slate balloons.


The top left part is my favorite sheet of the Carried Away Designer Series Paper.  I love the overhead map and thought it would be a perfect space for the small sentiment.  For the middle section, I picked the Smoky Slate polka dot page and put some clouds on it and some balloons with some tone on tone stamping.  


For the bottom part, I took another sheet of balloon printed paper and layered it on some Peekaboo Peach card stock.  I wrapped some of the striped Watermelon Wonder ribbon and added a wooden heart element.

I had so much fun making this little sampler.  I know that the other designers over at SSI did some amazing projects as well.  Head over there and don't forget to create your own and enter our weekly challenge.  


Friday, February 17, 2017

Lift Your Spirits

Happy Friday to you!!!!  I am so ready for this weekend.  My hubby has been putting in a lot of hours at work so I am ready for some quality family time.  I am thinking we will take the kiddos to see the Lego Batman Movie.  I am also hoping to steal some time downstairs in my studio to create.  I have a fun little card to share with you that we will be making at my Open House next week.


This was CASE'd from a YouTube video from Stampin' Up!  I needed a quick and easy project that my guests could make without all the bells and whistles.  Honestly, creating without the Big Shot for me is difficult because I love it so much.  I know it can be a little intimidating to new stampers.  So this card uses the Lift Me Up stamp set, Carried Away DSP from Sale-A-Bration and coordinating colors.  I love this stamp set because it has so many sentiments.  And the DSP uses so many of my favorite colors.  Mint Macaron you are my favorite and I am in complete denial over your upcoming retirement!     

This set is pretty much my favorite right now and I am definitely going to be playing with it some more and you will see it again in the near future!  For more favorites from my stampin' sister designers, head over to SSI!


Thursday, February 16, 2017

All About ME!

Today I am taking a moment to tell my readers a little bit about myself.  My blog here is full of all my creations as a Stampin' Up Demo, but there is more to learn about me.  I used to be a high school math teacher.  I met my husband at Penn State and we got married on July 4th, 2004.  I actually started scrapbooking after we got married.  I have an album for our wedding and honeymoon.  It is fun to look back at all these albums because I have truly come a long way:  


After having my daughter, Jessica in 2008, I definitely got even more into scrapbooking.  I quit my job teaching to stay home full time with her.  I have a lot of albums documenting the first few years of her life.  Here is one of my favorite layouts from her first birthday:  


As my daughter got older and busier I found less time to scrapbook.  It is this time I discovered stamping and card making and of course Stampin' Up!  After being a very good customer for a few years, I finally took the plunge in January of 2012 and signed up to be a demonstrator.  With my husband's busy job along with my daughter, I didn't have the time to make it a full fledged business, so I am mainly a hobby demonstrator.  I do love to share stamping with my friends and family so I will hold occasional open houses and classes when I can.

In July of 2013, we welcomed my son Tommy into our family.  He is absolutely adorable for good reason.  He can be so naughty sometimes.  Having two kids now, my time was even in shorter supply.  Fortunately for me Stampin' Up! joined with Project Life so I do have an album for my little guy first year:


Now my son is 3 and my daughter is 8 and I feel like I am always running around.  In addition to taking care of my family and home (sorta) I work at my son's preschool twice a week.  I love it there!  They are relocating to a brand new facility next year and I am so excited to be apart of it!   

Here is one of my favorite recent pictures of my family, taken selfie-style by my husband at the local fire company's carnival this past summer:


I would share a picture of my craft studio, but its a nightmare so I will just share a few recent projects.  Consider it a Thank You for reading all about me:


The So Very Much stamp directly on the Serene Scenery DSP.


I created my own DSP with the Delicate Details stamp and several shades of Sweet Sugarplum.


Here I heat embossed with some Copper embossing powder on the Falling In Love DSP.


And for this one I heat embossed with white embossing powder and ran the sponge brayers over it with Rich Razzleberry and Sweet Sugarplum.  I added some Bitty Buterflies cut from the Sweet Sugarplum Glimmer Paper which is a new SAB offering starting February 21st!    

Thanks so much for stopping by to learn about me!   I can't wait to see what we have in store at SSI tomorrow, check back and don't forget about the awesome Card Sketch Challenge!


Wednesday, February 15, 2017

Happy Scrappy Wednesday


Happy Hump Day to you!  This week is going by pretty quickly.  Today I have a fun card to share with you that I made strictly pulling scraps out from my scrap bin.  We all have them.  Now I have gotten better about keeping the teeny tiny pieces.  I now will get rid of the little pieces, except maybe the glimmer paper and the foil, I can always use up every pieces of that.  In creating just from the scrap bin, I stumbled upon a fun color combo; Flirty Flamingo, Peekaboo Peach and Pool Party.  It pretty much sound like a trip to Florida, ha ha!  Here is my card:


I had just bought this stamp set for the fun sentiments and great shapes so I was excited to see an opportunity to use it.  I knew I wanted to do a lot of layering, but I did cut the Pool Party heart from the inside layer.  No need to make more scraps, right?  I hadn't used that Brick Wall embossing folder in awhile, so I incorporated that!  I had that little bit of Flirty Flamingo envelope paper from a previous project and I knew it would be just enough.  Even though I had them for awhile, this might have been the first time I used the Sweet and Sassy Framelits.  They are so fun, I love how they layer so perfectly.  I knew I needed a little sparkly and I had a small piece of the Dazzling Diamonds Glimmer paper in my scrap bin which had just enough space for two Bitty Butterflies.   

This was a fun test, but honestly, I need to do it more often because I really do have a lot of scraps!  For more ideas how to use up all those odds and ends, head back to SSI.  


Monday, February 13, 2017

February Card Sketch

These weekends just go by faster and faster any more, huh?  The best thing about Mondays is that we have a new challenge for you over at Stylin' Stampin' Inkspiration.  Today is our card sketch and it is a great one:


I decided to combine some awesome Designer Series Paper with a fun and fabulous Sale-A-Bration stamp set:


Can you believe this is the first card I made with this Chick?  Something about the patterns and color of the Affectionately Yours Specialty DSP made me want to combine it with the Hey Chick stamp set.  I started with a Night of Navy card base and added that floral DSP with hints of copper in it.  I was afraid to cut it, but if I never cut it and use it, what is the point of buying it?  I added a few other pieces of the DSP and then stamped the funky chick and watercolored him with some blender pens.  I used the awesome combination of the Layering Ovals and the Stitched Shapes Framelit Dies.  I decided to use the Duet Banner punch for my sentiment, stamping in Watermelon Wonder and layering my banner on it as well.  I finished the card off with three Daffodil Delight enamel dots.  Here is the inside:  


I just stamped the cute sentiment and added a bit of Washi Tape.  Remember the insides of your cards and the envelopes!  

This sketch really gave me a chance to show off some amazing DSP.  I can't wait to see what you can do with this card sketch.  Create your project and upload it over at SSI!


Friday, February 10, 2017

Pop of Paradise and One Flirty Flamingo

Hopefully this you are as excited about the weekend as I am.  Fridays are the best and this one is even better since I just got to enjoy a fun relaxing snow day yesterday.  I wish I could say I stamped all day, but I actually just enjoyed time with my kiddos!  Today I am sharing a fun little card for you using a stamp set from the Annual Catalog.  This set features a very fun flamingo and its perfect because over at SSI we are sharing our favorite animal stamps.


I started with a Wild Wasabi card base and added some Whisper White that had been embossed with the Petal Burst folder.  I used a strip of the Flirty Flamingo envelope paper and then stamped that Flamingo in Flirty Flamingo ink and layered it on Flirty Flamingo card stock....say that five times fast!  I added the Hello sentiment stamped in Wild Wasabi and then some enamel shapes.  Here is the inside:


Since it is a Hello card, I left lots of space to write a little note and just added my coy little bird peeking around some leaves.  I really love this little guy, he just makes me happy!

I love the fun animal stamps that we have in all of the Stampin' Up! catalogs.  Head over to SSI to see what some of the other designers chose for their favorite animal stamp!  


Thursday, February 9, 2017

Stylin' Stampin' INKspiration's February Blog Hop


Can you believe it is already time for our February Blog Hop?  And with it being February and close to Valentine's Day our theme is Love is in the Air!  I was happy to play with a bundle that I haven't really used so much along with a fun Love theme.  As you hop along, please be sure to comment and show some love on every blog! We are always excited to hear from our followers! You should have just left stop number 9 on the Stylin' Stampin' INKspiration Blog Hop - Donna at Geek Squad Crafting. If so, you are in the right spot. If a link doesn't work or you get off track, you will find the full blog hop lineup below.

So the bundle I decided to use is the Lift Me Up bundle.  I just love the Hot Air Balloon, even though I think I would never have the guts to go up in one.  Here is my first card:


I used my favorite Valentine's Day color combination of Real Red and Pool Party with a touch of Crumb Cake.  I used the framelits to cut out all the parts of my balloon from the Sending Love DSP stack.  I used Pool Party to stamp the clouds on Whisper White and cut them out with the framelits.  I thought the Love is in the Air was the perfect sentiment!  Here is the inside:


I stamped the little love heart from the Lift Me Up stamp set and added a strip of Sending Love DSP.  I really love using up all the little scraps of my patterned paper this way.  


Here is the other card I made:


Okay, full disclosure here.  I stumbled upon this card from a mistake.  Originally I had intended on using the detailed balloon die cut from Gold Foil on top of the balloon in the previous card.  But I thought it looked a little too busy so I decided to use to make it the star of this card.  I put it over the Fabulous Foil Acetate.  I added a strip of Sending Love DSP underneath the sentiment and added a gold bow.  I finished the card off with some Real Red enamel hearts on the balloon.  Here is the inside:    


I decided to heat emboss a gold balloon and added another strip of DSP at the bottom.  


Thank you so much for stopping by today to see my projects!  Next up is Jen G. at Faith.Grace.Stamp.  I can't wait to see her fabulous creations!


Blog Hop Participant List:


  1. Nichole L. at Scrappy Stamps & Ink
  2. Cathy A. at Maine Mountain Stamper
  3. Tobe B. at The Craft Sea
  4. Diana E. at Stampin' Fun with Diana
  5. Pamela W. at Stinky Tofu
  6. Darcy J. at Dj's Stampin' Place
  7. Melissa S. at The Stamp Doc
  8. Cheryl H. at Create with Cheryl
  9. Donna S. at Geek Squad Crafting
  10. Jennifer G. at Jenny G Paper Crafts
  11. Jen G. at Faith.Grace.Stamp
  12. Jen P. at By the Shore Stamping
  13. Bree W. at Craft-somnia Momma
  14. Tonya B. at Stampin' with Tonya
  15. Kim R. at Stamping with Kim
  16. Darla R. at Stampin' with Darla


    Monday, February 6, 2017

    February Color Challenge

    I love stealing away some time and heading down to my studio to create.  My part time job has become very involved, so it is nice to have an opportunity to create something of my own.  But sometimes I need a little help, so that is why I love participating in online challenges.  Or in this case, providing some INKspiration for those wanting to participate in the Stylin' Stampin' INKspiration challenges.  The first Monday of the month is our color challenge.  Check it out:


    This is great because I am trying to really give those retiring In-Colors (Watermelon Wonder, Cucumber Crush, Mint Macaron, Tip Top Taupe and Delightful Dijon) a proper send off with lots of use.  Plus, I can't remember the last time I used So Saffron.  Oddly enough, after the colors were choosen, I determined the sketch of my card by grabbing a piece of Old Olive from the Brights Designer Series Paper Stack.  Then the rest of my card took shape:


    I love the Designer Series Paper Stacks...you get so much paper in such great universal patterns.  I have the Brights Collection and the Neutrals Collection.  With my card, I started with a So Saffron card base and added some Whisper White embossed with the Petal Burst embossing folder.  I added a strip of the script Old Olive DSP.  I decided to use the Lift Me Up bundle, so I die cut the large intricate hot air balloon in Watermelon Wonder.  I used some of the Striped Watermelon Wonder ribbon and layered on my sentiment.  I finished my card off with some rhinestones on the balloon and one accenting the sentiment.  Here is the inside:


    I added a few more balloons and another piece of the Old Olive DSP.  I really like these colors together, I would have never thought of them!  Now its your turn to create with them and upload your project over at SSI!


    Friday, February 3, 2017

    Tasty Treats DSP

    Stampin' Up! really out did themselves with the Designer Series Paper in the Occasions Catalog.  There are so many great patterns and prints perfect for all the winter and spring occasions!  Today at SSI we are sharing our favorites.  I decided to use the Tasty Treats DSP.  I love the fun designs and the bright colors.  The paper really is yummy, check it out:


    I thought I would share two cards I made with this paper and coordinating stamp set:


    I used 5 different and very colorful patterns of this paper with this fun card.  I got the sketch from Freshly Made Sketches 272, which is no longer an active challenge.  But it is still a fabulous sketch which really shows off lots of different patterned paper.  The background is the fun sprinkles pattern and then there are some stripes, dots and bursts patterns.  I sponged the edges of the ice cream cones circle to make it pop.  I stamped the sentiment right on the DSP with some Early Espresso ink.    


    For this card I just wanted to show how I used the DSP as inspiration for my focal point.  I made one of the exact bowls of ice cream in the background with the awesome framelits that coordinate with this stamp set.  And of course I used the amazing Stitched Shapes framelits to go with the Layering Ovals framelits.  Seriously, what would I do without my Big Shot?  


    How awesome is this pack of Designer Series Paper.  I didn't even highlight the two embossed sheets.  Head over to SSI to see everyone else's pick for favorite DSP.  


    Wednesday, February 1, 2017

    A Paper Rose

    With Valentine's Day fast approaching I wanted to find a little special way to tell my children's teachers how special they are.  Both my kids are blessed with wonderful teachers, and I try not to let a holiday get past without telling them.  I did a little digging on the internet and found this very cool little origami rose box and knew it would be a perfect home for these Strawberry Truffles I bought:


    It would be silly for me to explain how I did this, instead I will share the wonderful tutorial I used to create it.  I will share my list of Stampin' Up! supplies as well as some tips.  I tried using card stock and DSP but I found that the best Stampin' Up! paper was the envelope paper.  It folds easiest and was a color match (I used the Flirty Flamingo).  I used a 5" by 5" pieceof paper.  After following the indepth instructions I sponged the edges of the rose and then added a bit of the clear Wink of Stella glitter.  I added some Emerald Envy ribbon as leaves and glued it on with a hot glue gun.  The Love You sentiment comes from Scenic Saying stamp set from the Annual Catalog.  

    For more 3-D Valentine's Day projects, head back over to SSI.  Thanks for stopping by today!