Monday, October 31, 2016

Happy Halloween!

I am excited to share with you the little treats I made for my son's preschool teachers!  I used the September Paper Pumpkin Kit along with the Cookie Cutter Halloween stamp set and coordinating bundle and had so much fun:


I filled the test tube with M and M's.  I thought they would be a perfect mid-day chocolate fix for these fabulous women who are so amazing with these kids.  These little test tube holders were super easy to make.  I cut the paper 2.75" by 11" and then scored at .5", 2", 4", and 6".  I used the Tear Tape to hold it all together and the Baker's Twine helps to keep it from falling over.  And just how cute are those little people??!!  I just love them so much.  I am hoping that Stampin' Up! will have a coordinating spring stamp with this punch, maybe with a Cupid and a Bunny.  Anyways, Happy Halloween and hope you get some great treats and no tricks!  Head over to SSI for more Halloween Projects!  

Friday, October 28, 2016

K-Cup Holders

Can you believe that it is Friday already?  This weekend we have so many fun Halloween activities; Trunk or Treat at my son's preschool, Halloween parade with my daughter' brownie troops and at some time I need to carve some pumpkins with my family.  I like to give some Halloween treats to my friends and co-workers and I have some to share that go perfectly with the theme over at SSI, 3-D projects!  


This is a perfect little gifts for the gals I teach with. Coffee is always a good thing and the fun pumpkin paper from the Halloween Nights DSP paired perfectly with the Pumpkin Spice coffee!  I added a little Pumpkin Pie Glimmer Paper leaf for a sparkly fall touch.  The sentiment is from the Candy Cane Christmas stamp set.  

Thanks so much for checking out my project today.  Head back over to SSI for more 3-D projects!  

Wednesday, October 26, 2016

Washi Tape Tree

One of my craft resolutions this year was to only buy what I will use.  Which is difficult because I love everything.  This has turned into me unpacking a box of stamping supplies and leaving it out until I use it atleast once.  I am trying to use up all my DSP, ribbon and washi tape...or atleast a good chunk of what I buy.  This turns into me adding strips of washi tape and DSP to the inside of cards and on the envelopes and using ribbon to tie on tags to gift bags.  I am doing pretty well with this.  

I was going to try to limit myself buying washi tape because I ended up with quite a collection but I ended up falling in love with so many of the sets from the Holiday Catalog.  I made this quick and easy card using the Warmth and Cheer Designer Washi Tape, some sequins and a gold star.  


I am sure I saw this idea somewhere on Pinterest, but I can't remember where.  I am really happy with how this came out.  It was super easy and a great way to use up that washi tape!  I love the bright sequins as the lights and the gold foil star to top off my tree.  

Thanks for checking out my project.  Head over to SSI for more uses for washi tape!


Monday, October 24, 2016

October Technique Challenge

I hope that you had a wonderful weekend.  I spent mine, doing one of my most favorite things, stamping with some fabulous ladies.  I have lots of new projects that I can't wait to share with you, most of them for Christmas!  But today I get to share what I created for the challenge over at SSI.  Check it out:


This technique can be a bit of a messy one.  It reminds me how my dream craft room must either have a sink or be on the same floor as a bathroom.  I am currently in the basement, although I do LOVE my Stampin' Studio!  Here is my project:


I decided to use the Lucky Star embossing folder and add some Delightful Dijon ink to it.  I added it to a Delightful Dijon card base and decorated it with some Emerald Envy pine boughs I die cut and a Copper Foil bell that I punched out.  I fussy cut my sentiment and trimmed the card with some striped Washi Tape.  Here is a peek at the inside:


I stamped the sentiment in Cherry Cobbler and added some more washi tape to bring the project all together.  I love our technique challenge because they definitely push me out of my comfort zone.  Now you can create using this great technique and upload it over at SSI!


Friday, October 21, 2016

A Paper Pumpkin First

Today at SSI we are talking about our favorites on Friday and my favorite is the latest Paper Pumpkin Kit.  I got it on Monday and couldn't wait to do it.  In fact I did it that day, right away.  Here is a peek at the instructions:


The kit makes 8 super cute shaker cards that are super easy to make.  They will be perfect to send thank you notes for someone hosting Thanksgiving or just a thinking about you note.  Here are some close ups of the cards I made:


Cards can be made either direction and I just followed the directions.  It is hard to see in the pictures but the Very Vanilla background is slightly embossed with the a diagonal stripe which adds an elegant touch.  The rich colors of the card stock and sequins make this card perfect for the fall season.  I wish we could by those sequins because they are beautiful.  The directions to make the shaker cards were so easy to follow and now I just want to make more shaker cards!  I can't wait until the refills are available for this kit!

Head back over to SSI for more of the Design Team's favorites on this fabulous Friday!


Wednesday, October 19, 2016

CASE the Holiday Catalog

Stampin' Up! puts out such amazing product in their catalogs but they also have some amazing projects for us to draw inspiration from.  That is what we are doing over at SSI, CASEing (Copy And Share Everything) from the Holiday Catalog.  CASEing can be recreating a project or just using certain elements, like the layout, colors or stamps and accessories.  There are so many CASE-worthy projects, I had a hard time picking on.  Here is the card I am CASEing:


The card on the left caught my eye.  The bright Real Red and the cool Mint Macaron just work so well together.  And the layout is so simple.  Here is my CASE, flipping the card and using a different stamp/die set:


This was my first pass using the Santa's Sleigh Thinlits.  I can't wait to play with them again.  I stuck with the Red Glimmer Paper on Real Red card stock even though the background stripe paper has Cherry Cobbler in it.  I thin it still works.  Instead of adding some twine a trinket to the sleigh, I added some Emerald Envy metallic thread underneath the banner.  The sentiment comes from the Tin of Tags stamp set, which is fabulous!

Thanks so much for checking out my CASE'd card today.  Head over to SSI to see that other CASEs! 


Monday, October 17, 2016

October Inkspiration Challenge

I feel like Monday just sneaks up on you.  I was lucky to spend my Sunday night with my brother who came up for a little visit before some training her had in the city.  The best thing about Mondays are the weekly challenges from SSI.  This week we have our Inkspiration Challenge.  Let's look at the image chosen for this month:


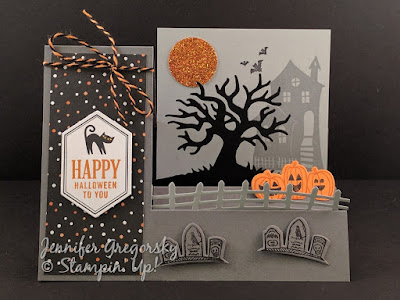
I decided to focus on the idea of the entrance but instead of just a door I did the whole house.  Here is my creation:


I had this idea of working a few stamps set and dies together using a Stair Step Card.  I like how it turned out but I would do a few things differently next time.  I love the tree and fence edglits, but next time I would adhere them to the front part, not the back.  You can't tell in the picture I took, but it doesn't lay as nice as I wanted it too.  I do like how I was able to create a three dimensional card with the help of the dies.  And my favorite part is the Pumpkin Pie Glimmer Paper as the moon. 

Below is a supply list, except the little hexagon tag and stamp on it is from the September Paper Pumpkin kit, which was super cute and I was so happy to get refills for it!  In fact you will see more I have created with this great kit in the future.  

Now its your turn to create something inspired by that image.  Use the colors, the theme, the images or even the layout.  Head over to SSI for all the details, more ideas from the design team and to upload your creation.  


Friday, October 14, 2016

A Spooky Fun Scene

Halloween is right around the corner and I have a fun Halloween card to share with you:


I had bought the Spooky Fun bundle right away but hadn't really played with the dies much.  That tree is so cool!  I really love all of the Halloween offerings from Stampin' Up! this year.  This bundle in particular lends itself to countless spooky scenes that are so easy to make with the coordinating products.  I also see other uses for that Basic Black and Gray Baker's Twine, could be perfect for a masculine card.  

Do you need more Halloween INKspiration?  Head over to SSI.


Wednesday, October 12, 2016

Welcome Baby!

Surprise!  Today we are showcasing projects made especially for our Design Team Member Tobe as she just had a little baby boy!  Congratulations Tobe!  Here is a sweet little Baby Boy card that will be making its way to you soon along with a little gift for your littlest boy:


I decided to go with a Dapper Denim and Soft Sky color scheme with Whisper White and a hint of Silver.  I used two stamp sets, the Something For Baby set (along with the Baby's First Framelits) and the Baby Bear set for the sentiment.  I embossed the Soft Sky background with the Happy Hearts Embossing Folder.  I also used the Layering Oval Framelits to create a frame for the cute little onesie I cut from the Dapper Denim envelope paper, which is something Tobe introduced me to, and now I am hooked!  I heat embossed my sentiment with silver embossing powder on some vellum and added some Dapper Denim enamel hearts.  Here is a peek inside:


I matted some Soft Sky onto some more envelope paper and stamped some cute baby items along with the sentiment from the Baby Bear stamp set.  I also did make a matching envelope with that fabulous envelope paper:


Thanks so much for checking out my special card for Tobe and her little man.  We have a few more baby projects for you to check out over at SSI!


Monday, October 10, 2016

October Card Sketch

We have an absolutely fabulous card sketch for you this week from Diana.  This is especially great for using up all that Designer Series Paper that you hoard.  Guess what, no one sees the pretty paper that you never use!  Here is the sketch:


So before I share my card, I feel like I need to tell you that I had been struggling a bit creatively.  Well after I finished this card, I found my mojo.  It was so very exciting.  Check it out:


The Halloween Nights DSP is awesome and the Pumpkin Pie Glimmer Paper is a MUST HAVE for any cute Halloween/Fall projects.  And how about my little vampire, how stinkin' cute it he?  I decided to make him a trick or treater popped up with Dimensionals.  He and his treat bag are colored in with the   That stamp is photopolymer so it can be bent to fit in the Duet Banner punch.  Here is a peek at the inside:


I love the skeleton too, he is also pretty cute.  So I had to add him to the inside along with the sentiment.  

So now it's up to you to make a card using this fabulous sketch and upload it over at SSI.  I can't wait to see what you create!


Friday, October 7, 2016

Vampires, Witches, and Ghosts, OH MY!

Stampin' Up! has so many cute and fun Halloween stamps this year.  I want them all, but I had to control myself.  I made a quick and easy card with just Whisper White Thick Card Stock, stamps, ink and some fun bakers twine.  Yeah, that's right, no die cuts from the big shot or layering embossed card stock and DSP.  Every now and again I can keep it simple.  Check it out:


I did use three different stamp sets here, so maybe that disqualifies me from the Quick and Easy camp, I am not sure.  But when I saw the sentiment, I need to be able to make all three.  Now technically all bats aren't vampires, but I think it works.  That house is pretty cute, right?  I love the pop of Pumpkin Pie from the sentiment and the baker's twine.  Here is all I did with the inside:


Just a Happy Halloween and some tombstones!  I need to start doing more quick and easy cards because the clean up from this card was a snap!  

For more Quick and Easy cards, head over to SSI.    


Wednesday, October 5, 2016

Presents and Pinecones Designer Series Paper

Have you heard the good news?  There is a great deal on Designer Series Paper packs going on at Stampin' Up!  Buy three packs, get the fourth for free!  Stampin' Up! really outdid themselves this year with their DSP packs, both in the Annual Catalog and the Holiday Catalog.  Today I thought I would share with you my favorite from the Holiday catalog; the Presents and Pinecones DSP.  Check it out:

There are so many of my favorite colors in this pack of paper including Mint Macaron as well as Emerald Envy.  I never realized how much I love our greens!  Anyways, this paper goes great with the Christmas Pines stamp set as well as the Seasonal Bells and Holly Berry Happiness.  Here is a card I made using four of the twelve different patterns:


I started with a Delightful Dijon card base and added the Delightful Dijon star print paper.  I punched out a circle of the evergreen bough print, I love how the Emerald Envy and Mint Macaron pair together with the Cherry Cobbler berries.  I added a gold enamel star.  I layered the circle on a Cherry Cobbler print trimmed with the bow patterned paper.  I decided to stamp my sentiment right on the DSP, no need to cut extra card stock!  Here is the inside:


I trimmed another piece of the DSP, the fun peppermint stripe to add to the inside and added the sentiment stamped in Cherry Cobbler.  

Thanks so much for checking out my card.  It was fun to show off this great DSP pack.  Head over to SSI where my fellow designers are showing off their favorite DSP as well!


Monday, October 3, 2016

October Color Challenge

Can you believe it is October already?  I feel like the days are so long but the weeks fly by.  If it is the beginning of the month, that means we have a wonderful color challenge for you at SSI.  Check it out:


Oooo...I would have never thought of pairing these colors together.  Here is what I came up with:


I decided on making a birthday card with the Sweet Cupcake bundle.  I did a lot of triple step stamping here but used the same colors and just stamped off beforehand.  I also added some Wink of Stella on the cupcake and the flame of the candle.  I added some Sweet Sugarplum accessories with the enamel shape and the glitter ribbon.  This was a fun card to make and I love playing with this bundle!

Now its your turn to create a project using these three colors and upload it over at SSI.